Designing a Science Lab
Challenge
Back in March, the TI team (Doug and I) was approached by the principal to see if we could help with the design of a brand new science space. At that time, we were under the impression that there would be a brand new STEM lab for Elementary, apart from the existing science lab. With the adoption of the Next Generation Science Standards, this made perfect sense. However, throughout the process we learned that it was not a new space, but rather the relocation and redesign of the current science lab. We also learned that our budget was going to be smaller than what we had thought.
Process
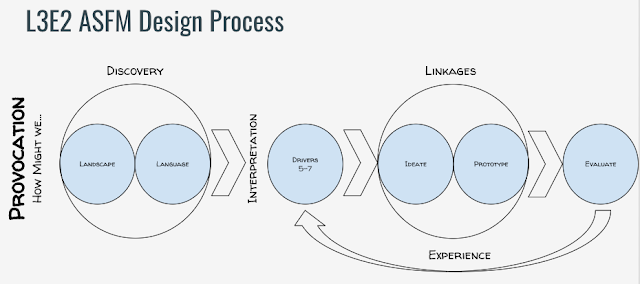
To get started, we called a meeting with the science reps, the school's projects team, the admin team, and of course, the science lab teacher, Ms. Georgina. This was the first of several meetings. We decided we'd follow the ASFM design process, created in partnership with design expert David Jakes.
The first step was to dissect the NGSS standards to identify the verbs. Teachers were grouped by tables and handed the standards according to grade level. Teachers wrote each word on a post-it note. Afterwards, the verbs were grouped and 5-7 learning verbs emerged per table. Those key verbs were shared and then the whole design team decided on which 7 learning verbs to work on.
Learning verbs:
The next step was to transform the learning verbs into learning statements. That is, what experience or behaviors do we want to see in students, and what kind of space will support this statement. This is what the design team developed:
At this time, we did not meet with the design team again. The TI team took all the data that was collected and determined the drivers and constraints.
Drivers:
Constraints:
We planned a third meeting with a smaller group of teachers. At this time, we provided teachers with the layout and the dimensions of the space. Basically it was just a rectangle that measured 10.6 m x 6.2 m. Teachers had the opportunity to provide feedback for the prototype of the lab. They also made a list of the materials and equipment they thought would be necessary to support teaching the Science standards.
With the help of Ms. Ime, one the teachers in the design team who has a background in architecture, we went about creating prototypes. We used the online application RoomStyler to have a 3D visual of what the space might look like. After many iterations we collected several layouts. It was time to take it back to the team to get more feedback. Actually, we posted the prototypes on the wall and asked the whole staff to stop by and look at the renderings. They could write down any comments, suggestions, or provide feedback.
Based on this feedback and keeping the drivers in mind, we developed this final prototype:
For the last few details we met with the projects team to talk about providers and constructors. Finally, the school year ended with all plans in place. Summer vacations meant waiting time for us. I was anxious to return to school and be able to see the final results. Take a look, below is the finished room:
This room transformed from being a classroom (Before)... into a science lab (After).
Results
Looking at the new science lab, we can see how the drivers are present in the finished space.
Reflection
In the end what seemed like a daunting task resulted in a rewarding experience. I personally appreciate the invitation to become involved in this learning opportunity. We were faced with various obstacles along the way, but I feel the new science lab met our expectations. This lab has become a highly visited space, bustling with kids that are eager to be scientists!
Cheers!'
Back in March, the TI team (Doug and I) was approached by the principal to see if we could help with the design of a brand new science space. At that time, we were under the impression that there would be a brand new STEM lab for Elementary, apart from the existing science lab. With the adoption of the Next Generation Science Standards, this made perfect sense. However, throughout the process we learned that it was not a new space, but rather the relocation and redesign of the current science lab. We also learned that our budget was going to be smaller than what we had thought.
Process
To get started, we called a meeting with the science reps, the school's projects team, the admin team, and of course, the science lab teacher, Ms. Georgina. This was the first of several meetings. We decided we'd follow the ASFM design process, created in partnership with design expert David Jakes.
Provocation: How might we design
a learning experience that allows students to be scientists?
Part 1: Identify learning verbs
The first step was to dissect the NGSS standards to identify the verbs. Teachers were grouped by tables and handed the standards according to grade level. Teachers wrote each word on a post-it note. Afterwards, the verbs were grouped and 5-7 learning verbs emerged per table. Those key verbs were shared and then the whole design team decided on which 7 learning verbs to work on.
Learning verbs:
- Observe
- Analyze
- Design
- Test
- Identify a problem
- Predict
- Plan
Part 2: Develop learning statements and Spatial concepts.
The next step was to transform the learning verbs into learning statements. That is, what experience or behaviors do we want to see in students, and what kind of space will support this statement. This is what the design team developed:
When students OBSERVE:
| |
LEARNING STATEMENTS
|
SPATIAL CONCEPTS
|
Observe relationship between different kinds of living things
|
Open space that allows movement
|
Observe the environment around you
|
Includes outdoor/indoor areas
|
Observe how things work
|
Offers/provides a variety of resources, tools, choices
|
Observe results of experiments and redesign the experiment
|
Flexibility in options for recording/observing data (both digital and analog)
|
Observe how things react
|
Safe environment for observation
|
Observe data gathered/given cause/effect
| |
When ANALYZING, students:
| |
LEARNING STATEMENTS
|
SPATIAL CONCEPTS
|
Look closely at evidence
|
Space to create and collect different types of evidence
|
Compare findings
|
Space that is safe when using tools to analyze
|
Ask questions
|
Space to exhibit findings/learnings and discuss/reflect
|
Determine if a solution works
|
Flexible spaces - lights, inside/outside, flooring
|
Use appropriate tools
|
Space for exploring/experimenting, testing/changing
|
Space that is accessible for everyone (meets needs)
| |
Space with access to different tools and a place to use them
| |
What learning looks like considering DESIGN:
| |
LEARNING STATEMENTS
|
SPATIAL CONCEPTS
|
Designing looks like students designing and creating
|
Big space to draw/sketch a plan
|
Designing looks like collaboration and communication
|
Available technology to redesign and research
|
Designing with access to a variety of tools
|
Organized area to know where to find available tools
|
Designing looks like students making and adapting plans
| |
Designing looks like students being flexible
| |
The experience to TEST looks like:
| |
LEARNING STATEMENTS
|
SPATIAL CONCEPTS
|
Learning looks like the application of a hypothesis
|
Space allows for experiments to take place
|
Learning looks like students examining variables
|
Space that has access to multiple materials
|
Learning looks like multiple attempts at data collection
|
Space to demonstrate data collection, processes and experimentation
|
Learning looks like scientists recording data
|
Space protected for data recording materials
|
Learning looks like adjusting materials to examine the variables
|
Space for finding ideas and outcomes
|
Learning should look enjoyable and fun
|
Space that’s open to visualize learners and learning from other groups
|
When IDENTIFYING A PROBLEM, learning looks like:
| |
LEARNING STATEMENTS
|
SPATIAL CONCEPTS
|
Asking questions
|
Space where all ideas and questions are valid and acknowledged
|
Looking for things that work
|
Space where “non-solutions” lead us to a solvable problem
|
Brainstorming
|
Space where time and materials are available
|
Finding similarities/differences
| |
Prototyping
| |
Focusing/zooming in
| |
Asking
| |
Researching
| |
To PREDICT, learning looks like:
| |
LEARNING STATEMENTS
|
SPATIAL CONCEPTS
|
Students having fun as a team
|
Students wearing lab coats, experts, professional
|
People collaborating with different ideas
|
Table groups with notebooks
|
Students on stools with notebooks and pencils writing down observations
|
Testing water or oil, cups
|
Testing hypothesis
|
Big mess on table
|
People making mistakes and persevering
|
Table, liquids, stools, liquid, cups
|
Students perform experiments
|
Sinks, clipboards, tall tables, storage with doors, storage for lab coats
|
People observing
| |
What learning looks like considering to PLAN:
| |
LEARNING STATEMENTS
|
SPATIAL CONCEPTS
|
Planning experiments
|
Space allows for experiments to take place
|
Planning how to make something, mixing substances
| |
Part 3: Consolidation of discovery data into drivers and constraints.
At this time, we did not meet with the design team again. The TI team took all the data that was collected and determined the drivers and constraints.
Drivers:
- Flexibility
- Choice
- Space
Constraints:
- Budget
- Room dimensions
- Storage space
Part 4: Prototyping
With the help of Ms. Ime, one the teachers in the design team who has a background in architecture, we went about creating prototypes. We used the online application RoomStyler to have a 3D visual of what the space might look like. After many iterations we collected several layouts. It was time to take it back to the team to get more feedback. Actually, we posted the prototypes on the wall and asked the whole staff to stop by and look at the renderings. They could write down any comments, suggestions, or provide feedback.
Based on this feedback and keeping the drivers in mind, we developed this final prototype:
For the last few details we met with the projects team to talk about providers and constructors. Finally, the school year ended with all plans in place. Summer vacations meant waiting time for us. I was anxious to return to school and be able to see the final results. Take a look, below is the finished room:
This room transformed from being a classroom (Before)... into a science lab (After).
Results
Looking at the new science lab, we can see how the drivers are present in the finished space.
- Flexibility: All furniture is mobile and agile. Carpet squares allow for flexible seating. Projector is not mounted, allowing for various display options.
- Choice: Students have choice over where to work and where to sit. (Stools are still pending to be delivered). White walls are writable.
- Space: Furniture can be moved and stacked to allow for changes in space arrangement. The back door leads to a terrace that extends the lab outdoors.
Reflection
In the end what seemed like a daunting task resulted in a rewarding experience. I personally appreciate the invitation to become involved in this learning opportunity. We were faced with various obstacles along the way, but I feel the new science lab met our expectations. This lab has become a highly visited space, bustling with kids that are eager to be scientists!
Cheers!'
This blog post was also published in ASFMLearns.


Comments
Post a Comment